Data
Data
The Cloud Platform's Data management module offers researchers efficient data storage, sharing, and collaboration solutions. It addresses issues such as underlying engineering complexities and difficulties with the transfer and reproduction of research findings. By providing functions such as upload, download, deletion, archiving, thawing, and metadata management, the platform promptly and accurately caters to various data service needs across different scenarios, creating a one‑stop data solution to support data‑driven research and collaborative innovation.
Project data supports both file and table management. Files primarily handle data files within the project, while tables focus on managing and organizing the metadata of project data, making it convenient for users to batch submit data.
Files
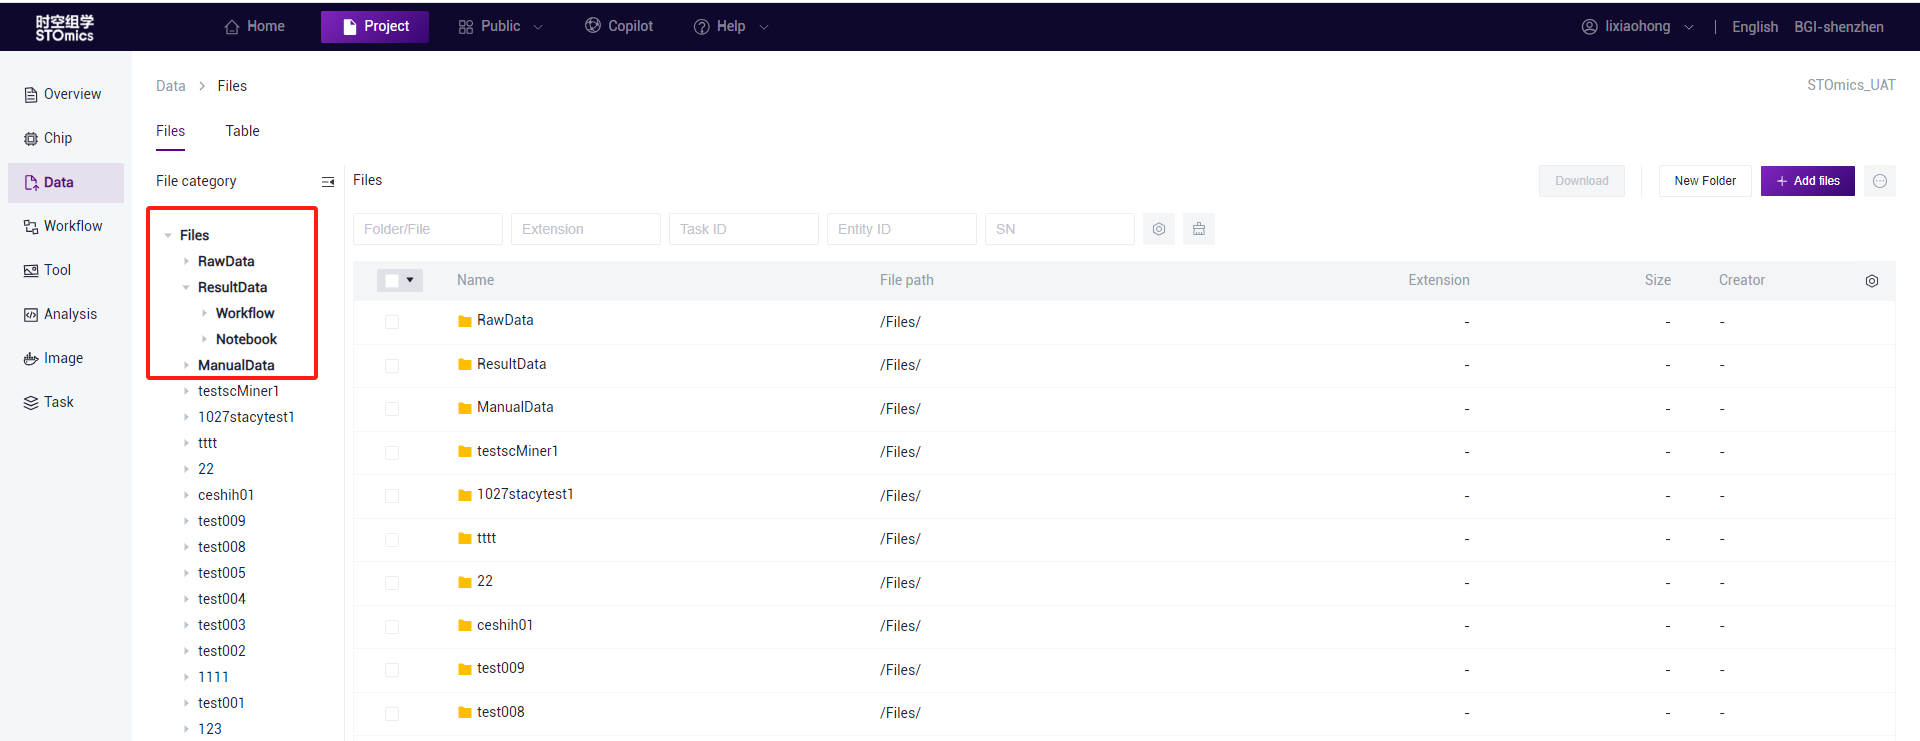
On the Files page, there are three default system folders: RawData, ResultData, and ManualData. The RawData folder is used for storing original FASTQ files generated by sequencing, image files, and mask files output by image quality control. In the ResultData folder, there are two subfolders; the Notebook folder for storing result data output by Notebooks, and Workflow folder for storage of result files output by workflow analysis. The ManualData folder is used to store manually processed image files (such as IPRs produced by Tissuecut or preprocessed IPRs uploaded by users) and matrix files of gene expression (gef).
Add files
Used for uploading files to the cloud platform through various methods, including Website upload, Cluster upload, Tool upload, and Copying from projects.
Add files—Website upload
This feature is used to transfer local files to the cloud platform using web-based transmission.
On the data management files page, after clicking on the "Website upload" option in the dropdown menu under the "Add files" button, you will be directed to the web upload interface. Simply drag the local file(s) to the designated area, then click "OK" to initiate the upload.


Note
When using Website upload, it is recommended that individual file sizes do not exceed 100MB for the Shenzhen or Chongqing regions; for the Alibaba Cloud region, individual file sizes should not exceed 2GB.
Batch uploads are supported, and uploaded files are placed in the current folder by default.
Files within the current folder must have unique names; otherwise, the upload will fail.
Add files— Cluster upload (Online editing)
For projects using BGI sequencing, data can be swiftly uploaded to the cloud platform through cluster upload.
On the File page, click the "Add files - Cluster upload" button to enter the cluster upload interface. In this interface, select "Online editing" edit the relevant information, and click "OK" to upload the FastQ file(s) to the current folder.

Note
Except for FastQ1, all other information on the above interface is optional. Move the data to the header field to view annotations for each field.
During cluster upload, data with filled SN will automatically synchronize to chip management.
If uploading FastQ files with library thawing, ensure that the FastQ path filled in has been granted "read" permissions to cluster accounts st_stereonote, st_notebook, and bigdata_autoanalysis before uploading.
At least one row of data must be filled in on the upload interface before saving.
This feature is only available in Shenzhen and Chongqing regions.
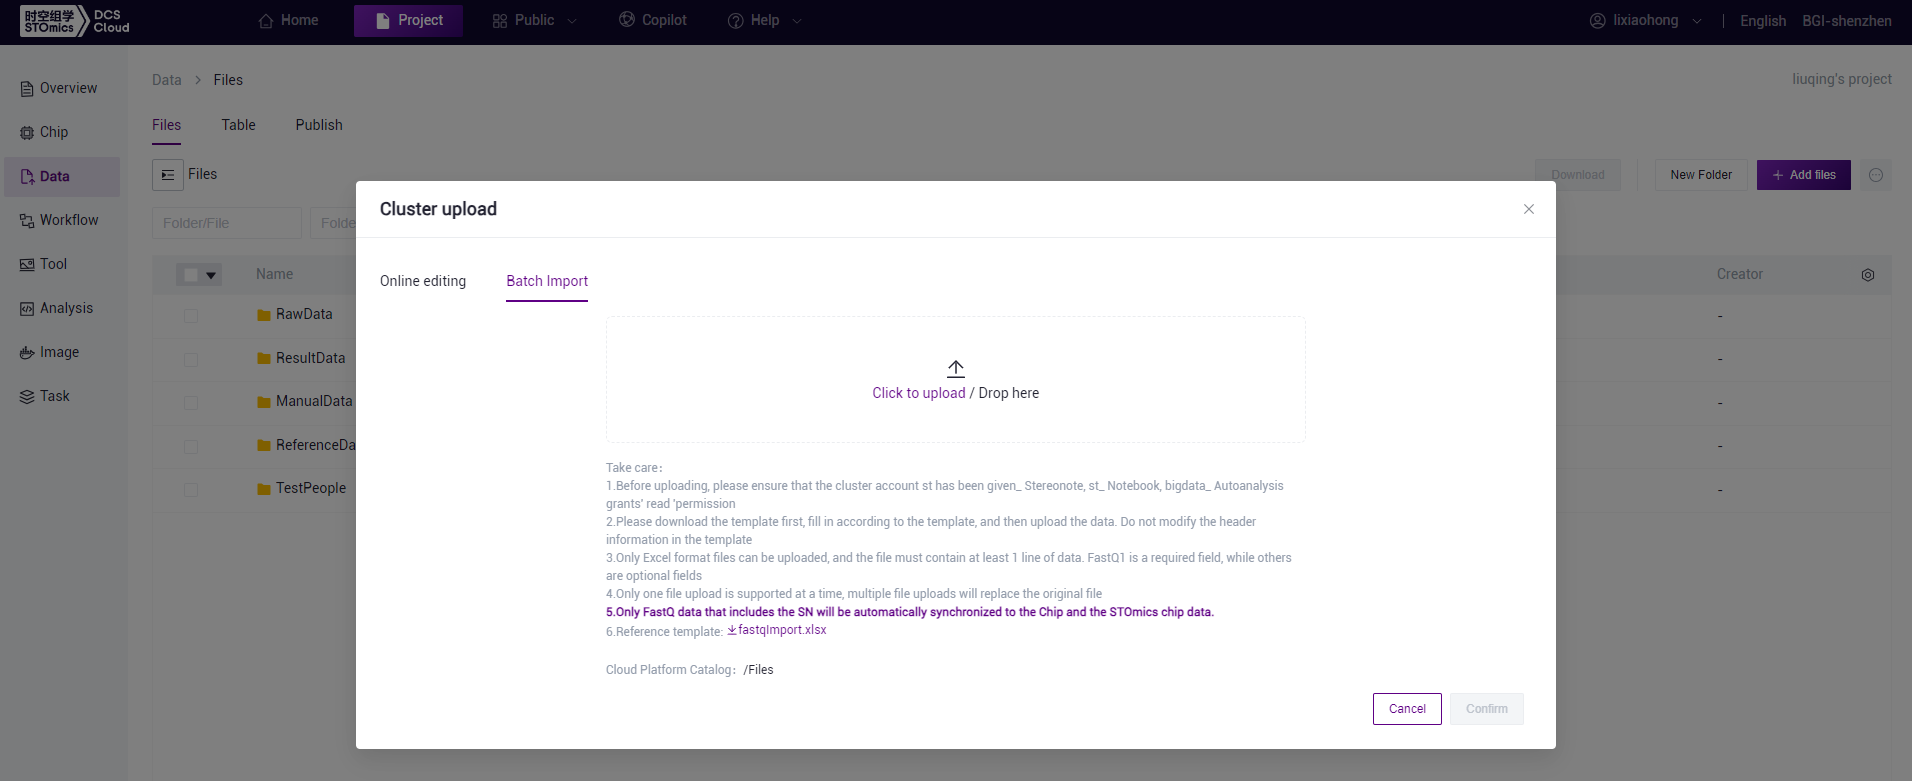
Add files—Cluster upload(Batch import)
On the File page, click "Add files - Cluster upload"to enter the cluster upload interface. Select "Batch Import," download the Excel template, fill in the relevant information, save it, drag the Excel file to the batch import upload area, and click "OK."
Note
If the FastQ files have been deleted after sequencing, and there is a need to analyze the thawed FASTQ on the cloud platform, it is necessary to specify in the thawing application to grant "read" permissions to cluster accounts st_stereonote, st_notebook, bigdata_warehouse, and bigdata_autoanalysis. Once thawing is completed, the new path can be uploaded using the cluster upload method.
Do not modify the header information in the template.
Only Excel format files are supported for upload, and the file must contain at least 1 row of data, with FastQ1 being a mandatory field, while others are optional.
During cluster upload, data with filled SN will automatically synchronize to chip management.
Only one file can be uploaded at a time, uploading multiple files will replace the original file.
This feature is only available in Shenzhen and Chongqing regions.
Add files—Tool upload
On the Files page, click the "Add files" button, and select "Tool upload" to access the tool upload interface.
ossutil tool
This feature is available only in Alibaba Cloud regions. Utilize this tool to directly upload local files or folders to Alibaba Cloud OSS buckets via command‑line operations.
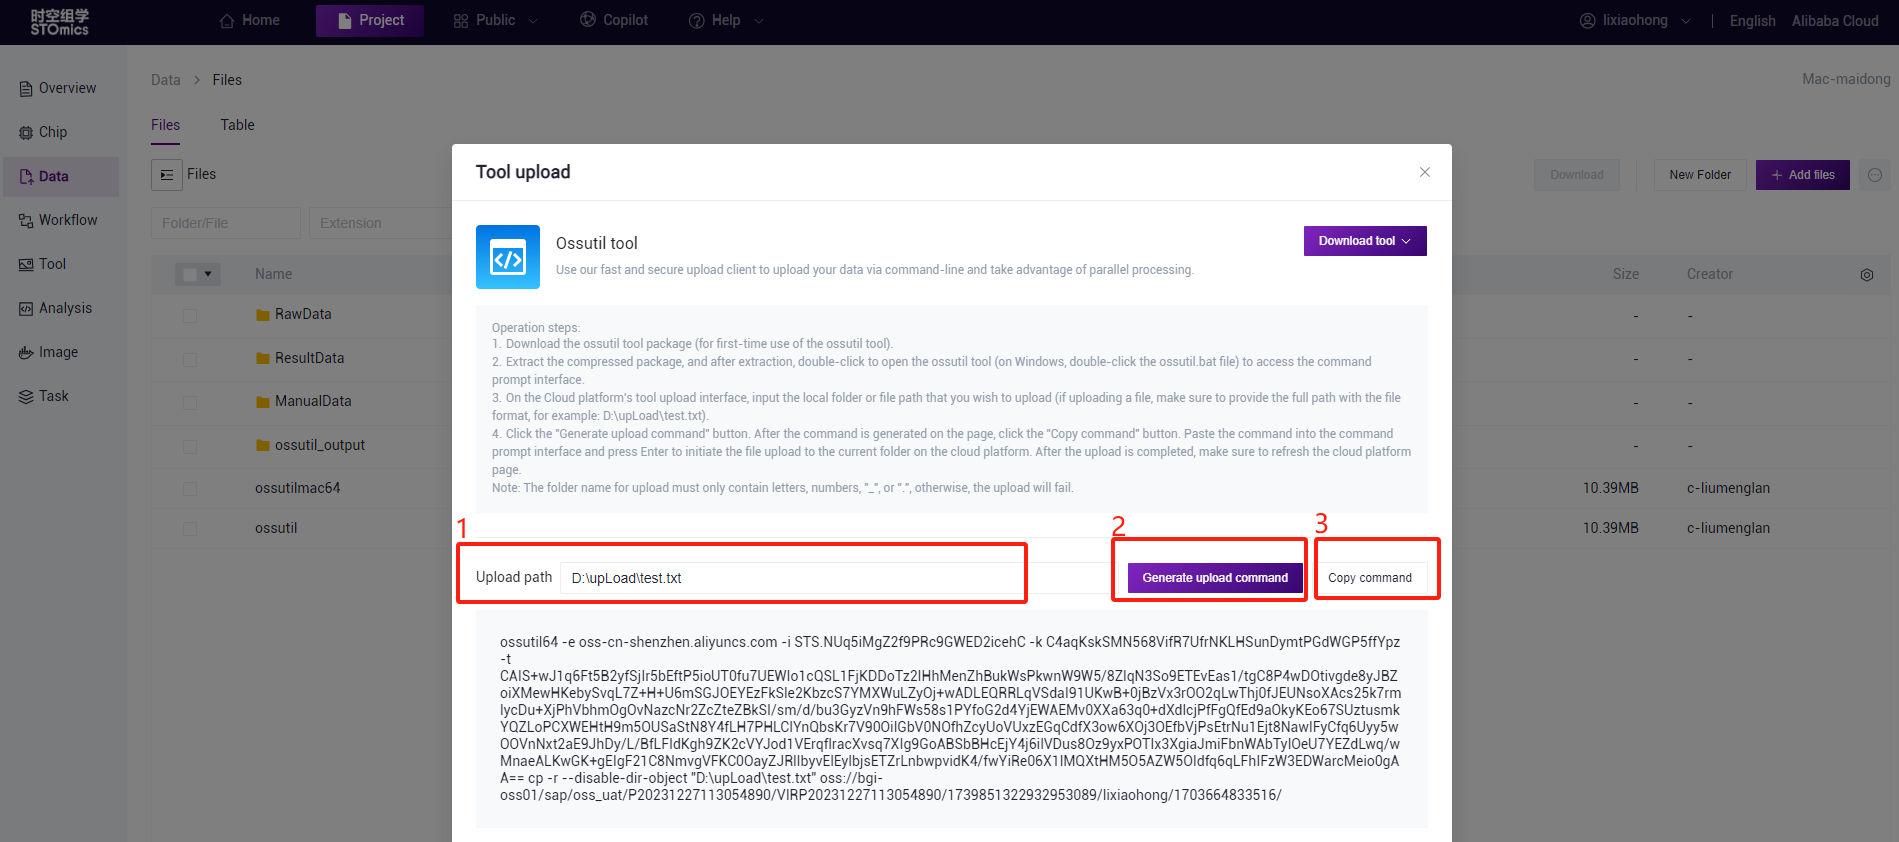
- For Windows users, the steps to upload using the ossutil tool are as follows:
Download the ossutil tool package (for first‑time use of the ossutil tool).
Extract the compressed package, and after extraction, double‑click to open the ossutil tool (on Windows, double‑click the ossutil.bat file) to access the command prompt interface.
On the Cloud platform's tool upload interface, input the local folder or file path that you wish to upload (if uploading a file, make sure to provide the full path with the file format, for example: D:\upLoad\test.txt).
Click the "Generate upload command" button. After the command is generated on the page, click the "Copy command" button. Paste the command into the command prompt interface and press Enter to initiate the file upload to the current folder on the cloud platform. After the upload is completed, make sure to refresh the cloud platform page.
Note
The folder name for upload must only contain letters, numbers, "_", or ".", otherwise, the upload will fail.
- For macOS users, the steps to upload using the ossutil tool are as follows:
Download the ossutil tool package (for first‑time use of the ossutil tool).
After opening the terminal, navigate to the downloaded folder (or drag the folder directly into the terminal), and grant authorization to the ossutil tool using the following command: chmod 755 ossutilmac64.
On the Cloud platform's tool upload interface, input the local folder or file path that you wish to upload (if uploading a file, make sure to provide the full path with the file format, for example: /Users/lixiaohong/Downloads/).
Click the "Generate upload command" button. After the command is generated on the page, click the "Copy command" button. Paste the command into the command prompt interface and press Enter to initiate the file upload to the current folder on the cloud platform. After the upload is completed, make sure to refresh the cloud platform page.

Note
If you encounter the message "macOS cannot verify the developer of ossutilmac64" when executing the upload command, you need to go to Apple Menu > System Preferences > Security & Privacy > General tab, and select "App Store and identified developers" (as shown in the figure below). After selecting this option, proceed with the steps starting from the second step mentioned above.

Add files—Project
This feature is used to copy data from other projects to the current project. On the Files page, click the "Add files ‑ project" button to enter the Project interface. On this interface, select the files or folders you want to copy and click the "Copy to project" button. In the pop‑up, click "Confirm" to proceed.

File Information Modification:
This feature is used to modify the attributes of files for better file retrieval. On the file list interface, select one or more files, click the "Edit" button, and a dialog for editing metadata will appear. After filling in the metadata information, click the "Save edit" button to apply the changes.

File Download
File Download—Web download
This feature is exclusive to the Alibaba Cloud region. It allows users to download Alibaba Cloud files to their local devices through a browser. Here are the steps:
On the file management page, select one or more files that you want to download.
Click the "Download ‑ Web download" button.

File Download—Ossutil tool download
This feature is exclusive to the Alibaba Cloud region. It allows users to download Alibaba Cloud files to their local devices through the Ossutil tool.
- Here are the steps for Windows users:
Download the Ossutil tool zip file (for the first‑time use).
Extract the downloaded zip file and double‑click to open the Ossutil tool, entering the tool interface.
On the cloud platform file page, select the files you want to download, click the "Download ‑ Tool download" button, then click "Generate download command," and finally click "Copy command." Paste the copied command into the tool interface. The files will be automatically downloaded to the current folder.


- Here are the steps for Linux users:
Download the Ossutil tool zip file (Linux version) for the first‑time use.
Copy the downloaded zip file to the cluster server and unzip it using the command: unzip ossutil‑v1.7.16‑linux‑amd64.zip.
Grant permission to the unpacked Ossutil tool using the command: chmod +x ossutil*.
On the cloud platform file page, select the files you want to download, click the "Download ‑ Tool download" button, then click "Generate download command," and finally click "Copy command." Paste the copied command into the tool interface, add ./ before the command, and execute the command. The files will be automatically downloaded to the current folder.
Note
The prerequisite for downloading files using the above method is that the local cluster can access the external network.

Copying File Full Path
Used to copy the file path to make it easier to fill out tables.
On the file page, hover over the name of the file whose path you want to copy and click the  button to copy the full path ending with the file format.

File Deletion
To delete a file or folder, select the file(s) or folder(s) and click the Deletebutton. Then, click Confirm in the pop‑up box to proceed with deletion.
Note: Once deleted, files cannot be restored through the cloud platform, so this action should be performed with caution.

Display Selected Files Only
After selecting multiple files across folders, if you wish to quickly deselect some files, check the "Show only selected" button at the top‑left corner of the list. This will show only the selected records on the page, allowing for quick deselection as illustrated below:

File Online Viewing
The platform integrates file‑opening tools for online viewing of file content.
After entering the project data file page, click on the file name to enter the online file viewing page. Current support for online viewing includes file formats such as PDF, PNG, CSV, TXT, and HTML.

Exporting File Information
This function is for exporting Excel format file metadata information. The exported file can then be adjusted and used as a table.
After entering the project data‑file page, select one or multiple files and click the Export button as shown below:

Operation Records
Used for viewing records of file addition and downloading.
After clicking the Operation records button, a data upload page will pop up, recording upload file names, methods, statuses, file paths, upload times, etc.

Table
Table are primarily used to manage and organize data, facilitating the batch submission of analysis tasks.
When a project is created, the system automatically generates chip tables, sequencing tables, and image tables, which are displayed on the Data-Table page.
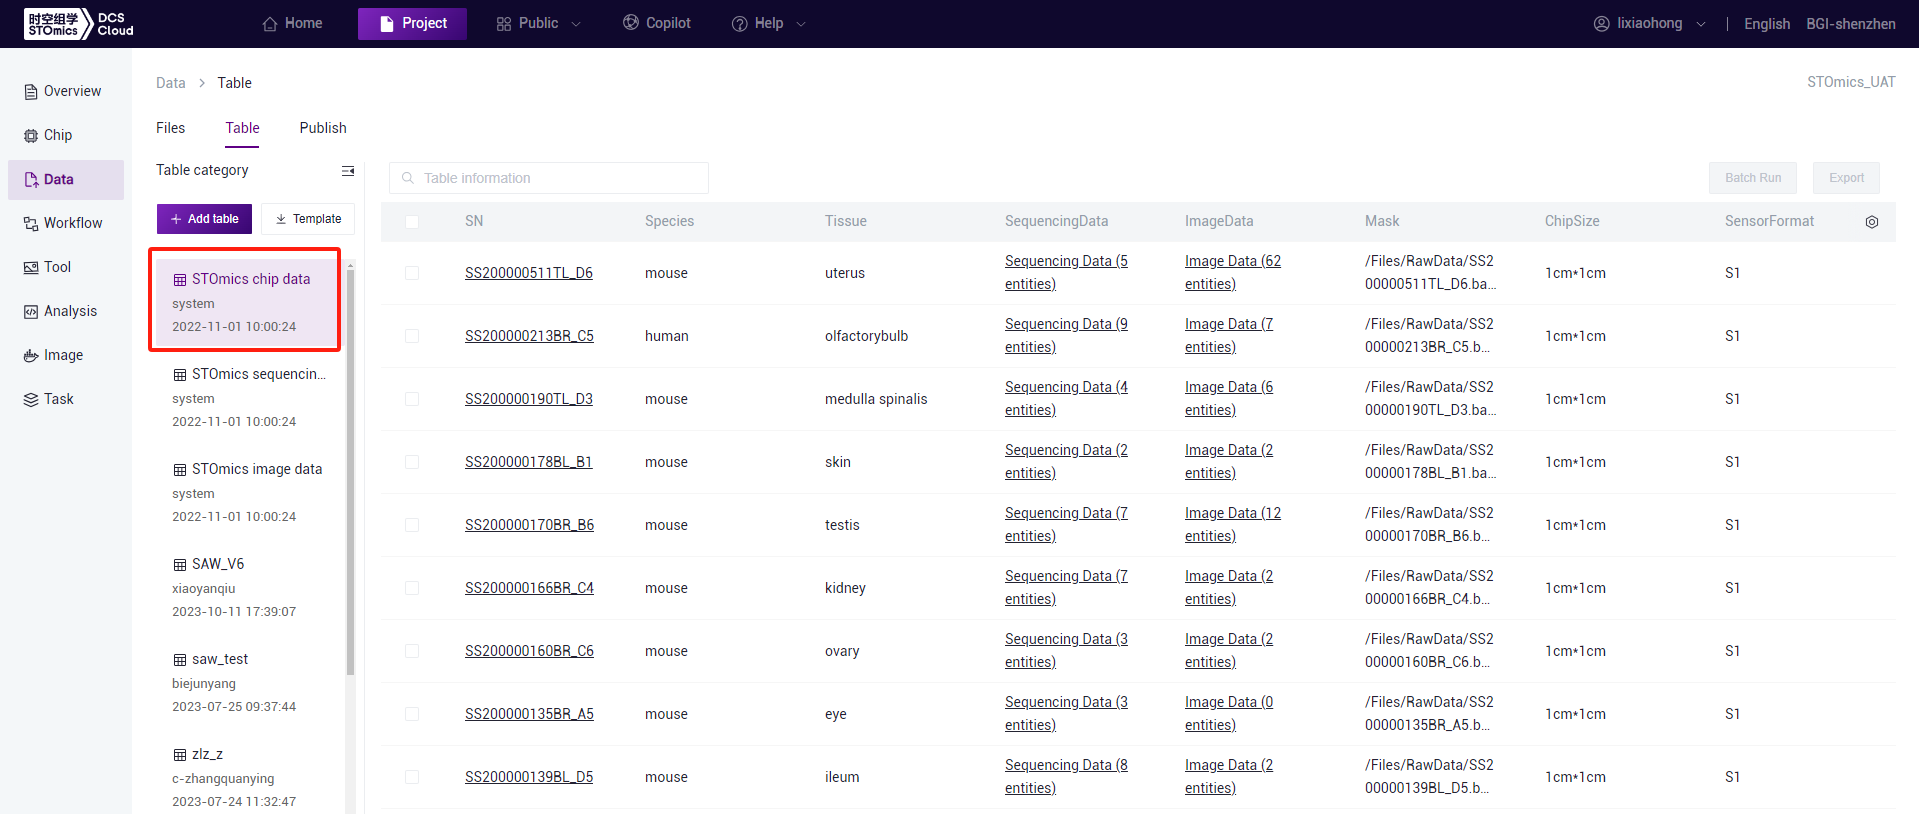
The STOmics chip table displays information related to chips, including chip number, specifications, size, mask, as well as corresponding sequencing data, image data, etc. For spatial-temporal commercial projects, the chip table will automatically generate its values; for individual projects, after associating chips in the chip management page, the chip table will automatically generate relevant information. Click "Table" on the Data page to enter the tables page, then click on the Chip Data table to open the chip table.
The STOmics sequencing data displays sequencing-related information.
Click "Table" on the Data page to enter the table page, then click on the sequencing data table to open the sequencing table. FastQ uploaded in chip details will be automatically synchronized with this table.

The STOmics image data displays spatial project image-related information, including original TAR and IPR, as well as preprocessed IPR. Click "Tables" on the Data page to enter the table page, then click on the STOmics image data to open the image table. IPR uploaded in chip details will be automatically synchronized with this table.

Add table
The icon  is used to download spreadsheet templates.

The icon  is used to add a new spreadsheet.

Download table
When a table is focused on by the mouse, icons for downloading table will appear. The icon is used to download the table locally.

Delete table
This allows users to delete an entire table at once.
When a table is focused on by the mouse, icons for deleting the table will appear, click the icon and then confirm in the popup box.

Note:Deletion is irreversible, so this should be done with caution.
Add data
This allows for the continuous addition of data to an existing table.
On the Data‑Table page, click on the tale to which you want to add data, click the Add data button in the top right corner, download the template, fill in information, and import it back.

Delete data
This allows for the deletion of some data within a table.
On the Data‑Table page, click on the table from which you want to delete data, select the data points to be removed, click the Delete button and then confirm in the popup box.

Note
As the deletion is irreversible, proceed with caution.
Download data
This is for downloading selected data from the table.
On the Data‑Table page, click on the table from which you wish to download data, select the relevant data points, and click Download to save an Excel file locally.
